Research
Feedback by Tom:
For my project he has told me that I should try to not show the similar scene over and over again when I'm shooting at targets. In order to solve this is to show the targets at the end when it has been shot.
Special effects:
Special effects is used in films and television by using props, camerawork, computer graphics etc. Special effects are usually in the production process and have a realistic visual to them, as they are physical, not animated.
There are at least 4 main Special effects that is used in films.
Here is the list:
Mechanical effects
Prosthetic makeup
Pyrotechnics
Atmospheric effects
5 examples of special effects:
The Walking Dead:

In this image the SFX makeup team are creating real life zombies with makeup on people before they shoot the scene for the ''The Walking Dead.'' SFX makeup helps to create an illusion into making people think they're real but in reality its just makeup being used.
In this video it shows how they've managed to create a real life looking zombie on a person.
The Ring:
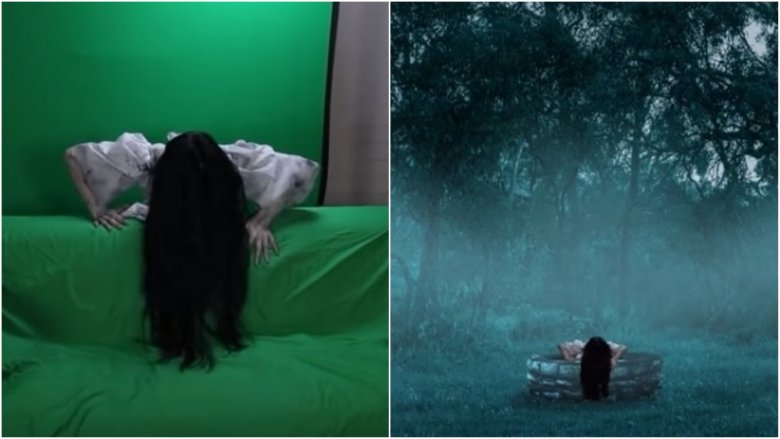
In this image the look of the vengeful ghost wasn't created digitally, however, it was the work of special effects makeup artist Rick Baker. They've used dead ghost like colours on a girl to give it that horror feel and to make the horrifying character look very realistic.
In this video it shows how flexible this character really is and what they've done in order to create a scary character like this.
Hellboy:

In this image SFX is being used just before shooting a scene in Hellboy. Prosthetic was used to create the whole body for this character. The reason to why they've done this is to create a devil like human however devils are different to humans for instance devils have horns which is why they had to add certain features to the devil. Overall the finished product of Hellboy stands out allot because it creates a massive illusion as it looks super realistic.
In this video it talks about how the main characters transforms into Hellboy and not only just about the makeup but also physical activities has to be done for this character.
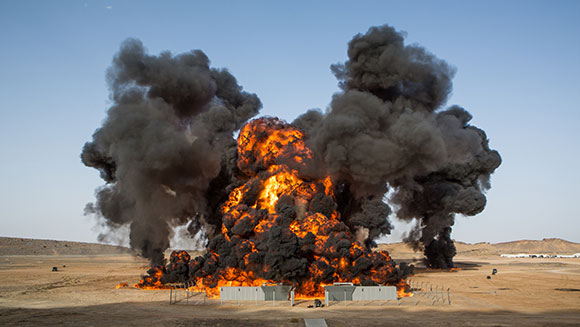
James Bond: Spectre:
In this image we can see an actual explosion. Not only it was used with actual flames and explosives but it also set a Guinness World Record for having the largest film stunt explosion. Using actual explosives and flames can draw in the audience and also enhance the scene because it helps to add what kind of genre it is and how it can also make the scene much more realistic towards the viewers.
In this clip it shows what types of explosives were used and how it all worked out in the end.
Lord Of The Ring Trilogy:

In this image we can see that this is no ordinary living thing but a realistic living character that was given special attention such as scars, dirt and prosthetic's that had to be recreated again and again over the filming period and in a huge variety of different locations. The make-up helped the characters fit into their middle Earth environment, helping to keep the enchanting nature of the film alive in every scene.
Visual effects:
Visual effects are used for live action footage and generated imagery so that in can used to create environments, animals or creatures which can make the film look very realistic however, doing these things legit would be very dangerous, expensive, time consuming or impossible to capture on film.
There are 8 visual effects used in films:
CGI
Colour correction
Chroma key
Simulation FX
Animation
Matte Painting
Modelling
Composting
5 examples of visual effects:
Avengers: Endgame

 This scene is from Avengers: Endgame. The same tech for Thanos also was used to create the Hulk. Motion capture suits were used to get Mark's facial expressions, but unlike other Avenger movies, this time they had to blend with the composite of the Hulk to create a more human version of the character. However, they've already done the Hulks face so much it just meant redesigning the lines and grimaces they already had using Mark's unique facial characteristics. In the end, that blend allowed them to be able to seamlessly drop the character into scenes that Mark could act in wearing the suit.
In this video it explains what equipment was used and what was needed in order for it to work.
Where it talks about Hulk: 3:13- 5:15
Dumbo:
/cdn.vox-cdn.com/uploads/chorus_image/image/63303260/01_dumbo_dtlr2_4k_r709f_still_181105.087357_ONLINE.0.jpg)
This scene is from Dumbo. Tim Burton's re-imagination includes a photo-realistic elephant that began as clay models that were scanned into computers for animation. The reason why this was created into ''Real life flying elephant'' is because it can give an illusion towards the younger viewers and how realistic it is.
This video was useful for this research because Richard Stammers talks about how they created Dumbo and what they did in order for it to work.
Dawn of the planet of the apes:

This scene is from Dawn of the planet of the apes. The visual effects were done by Weta Digital In addition to the apes, Weta created other digital animals, such as a herd of elk, a grizzly bear, and CG doubles of the live horses. The elk were created using key-frame animation and the digital crown enhancement software "MASSIVE", the bear through key-frame animation, and the horses with a mixture of key-frame animation and motion capture. The dots on the faces of the actors help to capture the movements of the facial expressions and mouth movements.
This video was useful for my research because it shows how effective the visual effects helped to add the addition of apes.
The Matrix:

This frozen moment is is being used by VFX supervisor, John Gaeta, he employed something called "bullet time." Gaeta worked with the directors and cinematographer to place 122 still cameras around Reeves, then triggering them in sequence. But in order to make sure the cameras weren't visible, he needed to create photorealistic sets so the cameras could be removed.
In this video it shows how they've used "bullet time" and what they've used to make it work.
Pacific Rim Uprising:

Peter Chiang, Overall VFX supervisor at DNEG for the movie managed an ensemble of visualisation and visual effects studios that produced almost 1600 VFX shots, including newly designed Jaegers and Kaiju monsters as well as an enormous number of robot-monster battles and massive environmental destruction.
In this video it shows how visual effects were implemented in this film and how successful it was.
https://youtu.be/CKymYDn69YU
Production Journey:
Throughout this research I've managed to learn how visual and special effects are used in films. This has helped me with my knowledge on what to do in order to produce something similar to these effects in my mini project.
From the original 10 effects, choose 2 to analyse in detail:
Special effects:
The Walking Dead
The special effect that is being used here helps to enhance the scene because in order to create these effects there are many steps to make it look perfect and realistic. To create the whole zombie mask look they'll have to create a prosthetic mask to the body. This is so that they can have the right fitment towards the actor before adding any makeup. Ones they do get the right fitment, it will be securely stuck to the actors head so that then the makeup can be added towards the look. When the base coat is added, the smaller details will be added. Without these the characters wont look as realistic as it doesn't have any detail to lure in the viewers into thinking they're ''real''.
Visual effects:
The matrix
Breaking the ''Bullet time'' effect into parts can show how successful this shot is when created. The main equipment needed firstly is by setting up the green screen where you want it. However, if you did it in a more open area you can make it more realistic since there wouldn't be parts cut out as much and more detail will be added. After that you'll need perfect lighting. This is so that you can remove the shadow so that it isn't shown in the background. After getting all of the shots you'll then need to place them all in an editing software for instance adobe premier or adobe after affects. After that you'll want to chose the image or video that you want to add on the green screen and then add your video you had taken on top of it. When everything has been edited it is always best to make it even more realistic by changing the colour, position the actor and even move the projector in a different position.
Proposal:
Backstory:
For this project, I will be creating a 20-30 second clip where I show off my skills by using visual effects. Reason to why I've chosen visual is because I'm more interested in visual than special and how I would like to use these skills to create an action scene of me shooting with a prop pistol at targets on the trees however I hit every shot on the head or at the centre of the target depending on what types of targets I'll print out. A movie that inspired me to do this is from a fantasy/ sci-fi film called suicide squad. The reason why I chose this film out of other films is because a character in this film called ''Deadshot'' hits every target on the head and doesn't miss a single shot. This has led me into doing interesting visuals my self as I would like to do visuals in the near future my self. What I'll be using for this scene is a fake prop pistol so that when I edit in after effects I can use gun fire, a bullet flying through and the lighting as the gun shoots. The character that I'll be playing as will have his face covered up. Overall this project can help develop my knowledge further because I'm interested in visual's and developing my skills now for visuals can help me improve these skills.
Opportunity:
The core problem I would like to aim to solve during this project is to create a realistic look to a gun shooting with animation of the bullet, the burst of flames from the gun and the lighting through visual effects. This is challenging because I've never really done proper visual effects on a video before and doing this will help me improve my skills and will give me a better knowledge on how it works. If I do get a bit clueless then I'll have to do some research to fill in the gaps. Overall I am confident with the camera work and also with my editing skill's as I've shown in the past projects.
Scope:
For scope, I'll be using visual effect for my mini project in a short action scene that I've created. What I'll be doing first is by getting the perfect location where there can be good low angle shots, close up, over the shoulder etc and those shots I'll be using to help me achieve the high marks. When I get every clip Ill have to firstly use Adobe Premier and then I'll be using Adobe After Effects and this is where I'll have to make the scene more realistic and also achieving high. Only downside by doing what I've chosen is the location because I'll be using a fake prop pistol in the woods whilst in the park.
Target Audience:
For my target audience it will be aimed at 15 year old's or older for my short clip. This is because there are teenagers around this age who play shooter games and even watch movies with guns in them in which they will have a good understanding about the scenes and to those who enjoy action based movies. Finally the reason why I think this is a suitable age group because the teenagers are mature enough to watch these.
Constraints:
A challenge I have to face is the location I'll be filming at. This is challenging because, the location I've decided to set my short scene is at a park in the woods. There is a risk where I could possibly trip over because of the sticks as well as people walking by looking at me clueless. The only issue for me is when. My friend will help me out to record the footage whilst I'm acting out however, I have to see if he will be free on that day or not because if not I'll have to find someone else and that is my biggest constraint problem at the moment.
Assumptions:
For my assumptions for this project, I would like the viewers to feel engaged towards my camera angle shots as well as the edits. I feel that this idea is only the surface films true meaning as its only a shooting range. Never the less, I still can see the viewers will have some kind of emotion towards the scene and even imagining them self's being there. Lastly I assume that I will be able to shoot my film film whilst there is another actor having a conversation with me in the scene. However, I'll have to be more organised and also plan out my schedule to know when my actor can use the camera and also act. Overall I should be able to get decent amounts of feedback on my progression with this project if I ask.
Resources:
For this project I'm responsible for everything I'll be doing for instance the equipment I'll be using. I'll have the advantage by having adobe at home if I need to carry on with the edits at home which can also help me improve my skills. My friend will be providing me a tri-pod as I already own a camera. Lastly clothing wont be an issue for my project however, my main prop which is a pistol might be a slight issue as my friend might be able to provide me one but if not I'll have to buy one my self.
Success:
In order to measure success in my project, I'll have to show my full potential to what I can do when I finish my edits. The finished product will be displayed on this blog where teachers and peers can watch my finished product and hopefully intrigue them. I would like to hear feedback from my teachers and even from peers to see what I could improve on next. Lastly to have success of the project, I will need to get all the work done by deadlines as well as schedules to what I need to do on each day and then set a target.
Envision:
What I'm hoping to aim for is to engage the viewer to what I've managed to produce for my project. If my project becomes really positive then Visual Effects is something I'll one hundred percent carry on with Visuals and adapt them even further. For this project I would like to show my success to people who would like to collaborate with me for future projects. Doing this project will make me want to work hard and also accomplish something that I've never done before.
Production Journey:
Throughout this task, I had to complete the proposal in detail to show what I'll be doing and what my targets are and so on. This will help me for my project because I can look back through what I wrote to see what I want to improve on and to what I want to achieve.
Lesson Schedule:
29th February:
For this day I would like to finish all my lesson schedule so I know what I'll be doing. I will also complete my planning for inspiration.
1st March:
For this day I would like to finish narrative and location for brainstorming ideas.
2nd March:
For this day I would like to start and finish my storyboard so that when I do go and record, I will know what to do. After that I will include the shot list as well as the recce.
3rd March:😁
For this day I would like to complete the Risks and Hazards as well as the Legal and ethical as well as the script.
4th March:
For this is when I'll start my recordings and after I've done the recordings I'll start to edit them on the day.
5th March:
Adding anything else I'm missing onto the blog.
Planning:
The essentials I will need are as follows:
The locations which is a the woods.
An actor to act with me at the beginning of the scene.
Visual effects will be used ones I've done the edits.
Finally the genre is action.
Production Journey:
Throughout this task I've managed to create a schedule for my MFP to see what I'll be doing throughout the days before the deadline. This will help me to keep to see what I'll have to achieve throughout these days.
Inspiration:
What I'll be recreating is a scene from suicide squad where the character called Deadshot shoots at targets and doesn't miss. He also hits the targets at the same spot every time and even pierces through a metal target. However what I'll do is recreating something similar to that however I'm in the woods running through and shooting at targets.
Here is the clip to what I'll like to recreate.
I've also done some research on what to add in my edits for instance the gun muzzle flare effect and here is the video of it:
Narrative and location:
With my 20-30 second short film, I will open up the scene of me running to a location of the meeting whilst I'm 5 min late for it. I will be doing a low angle tracking shot of my legs and feet running through the woods to start it of intense. After I make it to the location, I'll be there panting whilst my hands are on my knees. This is so that the viewers are already keen to know whats going on.
After the conversation meeting, I'm put to the test to hit the targets that are scattered around the woods which is where I show off my camera skills as well ass my visual effect edits in Adobe After Effects.
Production Journey:
Throughout these tasks I've managed to talk about my inspiration for my mini project because I'll be recreating something similar towards it. I've also done some re search to help me out with my edits so that I know what and how to edit with visuals towards my edits.
Storyboard draft ideas (sorry for my awful drawing):
Shot one:
For this shot I will be shooting the protagonists legs whilst he is running through the woods. It will be a mid shot as well as a tracking shot.
Shot two:
For this shot it is still the protagonist running through the woods but this time its his upper body shot. It will be a close up shot and a tracking shot.
Shot three:
As the protagonist makes it to his destination where he is supposed to meet up, he arrives 5 min late and is breathing heavily whilst his hands are on his knees whilst the second character starts asking him questions to why he was late etc. It will be a mid shot to where the protagonist has his hands on his knees and also a close up to his face of his heavy breathing. after that it will be a mid shot of both the protagonist and the second character at a side view.
Shot four:
Ones the second character finishes his conversation, he then gives the gun towards the protagonist and he doesn't remember if its loaded already or not so the protagonists points at an direction and shoots to check. An extreme close up will be used as the second character hands the weapon to the protagonist. After that there will be a close up of the protagonist checking out the weapon and then a mid shot of him shooting the gun. This is where my visual effects begin.
Shot five:
For this shot the protagonist goes ahead and shoots at scattered targets in the woods. Some shots will have over the shoulder shots, some will have a close up of him shooting and then also a tracking shot of his legs running through the woods. This is so that it can make the scene much more intense.
Shot six:
For this final shot it will show all the targets with a close of each next too each other in the video. The targets will have the same hole where the protagonist shot to show his accuracy. This will however show at the top of the clip and at the bottom of the clip it will show the protagonist where he just finished the shooting range and takes off his glasses slowly as an extreme close up and finish's there.(However, this may differ).
Production Journey:
With this task I've managed to create a storyboard to help me know what types of shots I'll be producing when shooting the shots as well as what types of actions the actors will do throughout the shooting.
Practice run with my edits:
I've done here is I've added the sound of a gun, a reload sound effect for the gun, added lighting whenever I shoot and also finally the flame at the end of the gun as I shoot. I've used Adobe after effects for the edits for the gun and adobe premier for the sound of the gun.
Production journey:
What I've done here is I've produced my self a practise edit of me ''shooting'' a pistol by adding visuals in adobe after effects whilst recording it on my phone.
Shot list:


Script:


Recce:


Legal and ethical:

Risk assessment:
Risk and Hazards:
 Production journey:
For this final task of the research I've managed to produce all of the work sheets for my mini final project to show what I need to include for each sheet for instance the risks, the shots, script, ect...
For my project he has told me that I should try to not show the similar scene over and over again when I'm shooting at targets. In order to solve this is to show the targets at the end when it has been shot.
Special effects:
Special effects is used in films and television by using props, camerawork, computer graphics etc. Special effects are usually in the production process and have a realistic visual to them, as they are physical, not animated.
There are at least 4 main Special effects that is used in films.
Here is the list:
Mechanical effects
Prosthetic makeup
Pyrotechnics
Atmospheric effects
5 examples of special effects:
The Walking Dead:
In this image the SFX makeup team are creating real life zombies with makeup on people before they shoot the scene for the ''The Walking Dead.'' SFX makeup helps to create an illusion into making people think they're real but in reality its just makeup being used.
In this video it shows how they've managed to create a real life looking zombie on a person.
The Ring:
In this image the look of the vengeful ghost wasn't created digitally, however, it was the work of special effects makeup artist Rick Baker. They've used dead ghost like colours on a girl to give it that horror feel and to make the horrifying character look very realistic.
In this video it shows how flexible this character really is and what they've done in order to create a scary character like this.
Hellboy:
In this image SFX is being used just before shooting a scene in Hellboy. Prosthetic was used to create the whole body for this character. The reason to why they've done this is to create a devil like human however devils are different to humans for instance devils have horns which is why they had to add certain features to the devil. Overall the finished product of Hellboy stands out allot because it creates a massive illusion as it looks super realistic.
In this video it talks about how the main characters transforms into Hellboy and not only just about the makeup but also physical activities has to be done for this character.
James Bond: Spectre:
In this image we can see an actual explosion. Not only it was used with actual flames and explosives but it also set a Guinness World Record for having the largest film stunt explosion. Using actual explosives and flames can draw in the audience and also enhance the scene because it helps to add what kind of genre it is and how it can also make the scene much more realistic towards the viewers.
In this clip it shows what types of explosives were used and how it all worked out in the end.
Lord Of The Ring Trilogy:
In this image we can see that this is no ordinary living thing but a realistic living character that was given special attention such as scars, dirt and prosthetic's that had to be recreated again and again over the filming period and in a huge variety of different locations. The make-up helped the characters fit into their middle Earth environment, helping to keep the enchanting nature of the film alive in every scene.
Visual effects:
Visual effects are used for live action footage and generated imagery so that in can used to create environments, animals or creatures which can make the film look very realistic however, doing these things legit would be very dangerous, expensive, time consuming or impossible to capture on film.
There are 8 visual effects used in films:
CGI
Colour correction
Chroma key
Simulation FX
Animation
Matte Painting
Modelling
Composting
5 examples of visual effects:
Avengers: Endgame
This scene is from Avengers: Endgame. The same tech for Thanos also was used to create the Hulk. Motion capture suits were used to get Mark's facial expressions, but unlike other Avenger movies, this time they had to blend with the composite of the Hulk to create a more human version of the character. However, they've already done the Hulks face so much it just meant redesigning the lines and grimaces they already had using Mark's unique facial characteristics. In the end, that blend allowed them to be able to seamlessly drop the character into scenes that Mark could act in wearing the suit.In this video it explains what equipment was used and what was needed in order for it to work.
Where it talks about Hulk: 3:13- 5:15
Dumbo:
This scene is from Dumbo. Tim Burton's re-imagination includes a photo-realistic elephant that began as clay models that were scanned into computers for animation. The reason why this was created into ''Real life flying elephant'' is because it can give an illusion towards the younger viewers and how realistic it is.
This video was useful for this research because Richard Stammers talks about how they created Dumbo and what they did in order for it to work.
Dawn of the planet of the apes:
This scene is from Dawn of the planet of the apes. The visual effects were done by Weta Digital In addition to the apes, Weta created other digital animals, such as a herd of elk, a grizzly bear, and CG doubles of the live horses. The elk were created using key-frame animation and the digital crown enhancement software "MASSIVE", the bear through key-frame animation, and the horses with a mixture of key-frame animation and motion capture. The dots on the faces of the actors help to capture the movements of the facial expressions and mouth movements.
This video was useful for my research because it shows how effective the visual effects helped to add the addition of apes.
The Matrix:

This frozen moment is is being used by VFX supervisor, John Gaeta, he employed something called "bullet time." Gaeta worked with the directors and cinematographer to place 122 still cameras around Reeves, then triggering them in sequence. But in order to make sure the cameras weren't visible, he needed to create photorealistic sets so the cameras could be removed.
In this video it shows how they've used "bullet time" and what they've used to make it work.
Pacific Rim Uprising:
Peter Chiang, Overall VFX supervisor at DNEG for the movie managed an ensemble of visualisation and visual effects studios that produced almost 1600 VFX shots, including newly designed Jaegers and Kaiju monsters as well as an enormous number of robot-monster battles and massive environmental destruction.
In this video it shows how visual effects were implemented in this film and how successful it was.
https://youtu.be/CKymYDn69YU
Production Journey:
Throughout this research I've managed to learn how visual and special effects are used in films. This has helped me with my knowledge on what to do in order to produce something similar to these effects in my mini project.
From the original 10 effects, choose 2 to analyse in detail:
Special effects:
The Walking Dead
The special effect that is being used here helps to enhance the scene because in order to create these effects there are many steps to make it look perfect and realistic. To create the whole zombie mask look they'll have to create a prosthetic mask to the body. This is so that they can have the right fitment towards the actor before adding any makeup. Ones they do get the right fitment, it will be securely stuck to the actors head so that then the makeup can be added towards the look. When the base coat is added, the smaller details will be added. Without these the characters wont look as realistic as it doesn't have any detail to lure in the viewers into thinking they're ''real''.
Visual effects:
The matrix
Breaking the ''Bullet time'' effect into parts can show how successful this shot is when created. The main equipment needed firstly is by setting up the green screen where you want it. However, if you did it in a more open area you can make it more realistic since there wouldn't be parts cut out as much and more detail will be added. After that you'll need perfect lighting. This is so that you can remove the shadow so that it isn't shown in the background. After getting all of the shots you'll then need to place them all in an editing software for instance adobe premier or adobe after affects. After that you'll want to chose the image or video that you want to add on the green screen and then add your video you had taken on top of it. When everything has been edited it is always best to make it even more realistic by changing the colour, position the actor and even move the projector in a different position.
Proposal:
Backstory:
For this project, I will be creating a 20-30 second clip where I show off my skills by using visual effects. Reason to why I've chosen visual is because I'm more interested in visual than special and how I would like to use these skills to create an action scene of me shooting with a prop pistol at targets on the trees however I hit every shot on the head or at the centre of the target depending on what types of targets I'll print out. A movie that inspired me to do this is from a fantasy/ sci-fi film called suicide squad. The reason why I chose this film out of other films is because a character in this film called ''Deadshot'' hits every target on the head and doesn't miss a single shot. This has led me into doing interesting visuals my self as I would like to do visuals in the near future my self. What I'll be using for this scene is a fake prop pistol so that when I edit in after effects I can use gun fire, a bullet flying through and the lighting as the gun shoots. The character that I'll be playing as will have his face covered up. Overall this project can help develop my knowledge further because I'm interested in visual's and developing my skills now for visuals can help me improve these skills.
Opportunity:
The core problem I would like to aim to solve during this project is to create a realistic look to a gun shooting with animation of the bullet, the burst of flames from the gun and the lighting through visual effects. This is challenging because I've never really done proper visual effects on a video before and doing this will help me improve my skills and will give me a better knowledge on how it works. If I do get a bit clueless then I'll have to do some research to fill in the gaps. Overall I am confident with the camera work and also with my editing skill's as I've shown in the past projects.
Scope:
For scope, I'll be using visual effect for my mini project in a short action scene that I've created. What I'll be doing first is by getting the perfect location where there can be good low angle shots, close up, over the shoulder etc and those shots I'll be using to help me achieve the high marks. When I get every clip Ill have to firstly use Adobe Premier and then I'll be using Adobe After Effects and this is where I'll have to make the scene more realistic and also achieving high. Only downside by doing what I've chosen is the location because I'll be using a fake prop pistol in the woods whilst in the park.
Target Audience:
For my target audience it will be aimed at 15 year old's or older for my short clip. This is because there are teenagers around this age who play shooter games and even watch movies with guns in them in which they will have a good understanding about the scenes and to those who enjoy action based movies. Finally the reason why I think this is a suitable age group because the teenagers are mature enough to watch these.
Constraints:
A challenge I have to face is the location I'll be filming at. This is challenging because, the location I've decided to set my short scene is at a park in the woods. There is a risk where I could possibly trip over because of the sticks as well as people walking by looking at me clueless. The only issue for me is when. My friend will help me out to record the footage whilst I'm acting out however, I have to see if he will be free on that day or not because if not I'll have to find someone else and that is my biggest constraint problem at the moment.
Assumptions:
For my assumptions for this project, I would like the viewers to feel engaged towards my camera angle shots as well as the edits. I feel that this idea is only the surface films true meaning as its only a shooting range. Never the less, I still can see the viewers will have some kind of emotion towards the scene and even imagining them self's being there. Lastly I assume that I will be able to shoot my film film whilst there is another actor having a conversation with me in the scene. However, I'll have to be more organised and also plan out my schedule to know when my actor can use the camera and also act. Overall I should be able to get decent amounts of feedback on my progression with this project if I ask.
Resources:
For this project I'm responsible for everything I'll be doing for instance the equipment I'll be using. I'll have the advantage by having adobe at home if I need to carry on with the edits at home which can also help me improve my skills. My friend will be providing me a tri-pod as I already own a camera. Lastly clothing wont be an issue for my project however, my main prop which is a pistol might be a slight issue as my friend might be able to provide me one but if not I'll have to buy one my self.
Success:
In order to measure success in my project, I'll have to show my full potential to what I can do when I finish my edits. The finished product will be displayed on this blog where teachers and peers can watch my finished product and hopefully intrigue them. I would like to hear feedback from my teachers and even from peers to see what I could improve on next. Lastly to have success of the project, I will need to get all the work done by deadlines as well as schedules to what I need to do on each day and then set a target.
Envision:
What I'm hoping to aim for is to engage the viewer to what I've managed to produce for my project. If my project becomes really positive then Visual Effects is something I'll one hundred percent carry on with Visuals and adapt them even further. For this project I would like to show my success to people who would like to collaborate with me for future projects. Doing this project will make me want to work hard and also accomplish something that I've never done before.
Production Journey:
Throughout this task, I had to complete the proposal in detail to show what I'll be doing and what my targets are and so on. This will help me for my project because I can look back through what I wrote to see what I want to improve on and to what I want to achieve.
Lesson Schedule:
29th February:
For this day I would like to finish all my lesson schedule so I know what I'll be doing. I will also complete my planning for inspiration.
1st March:
For this day I would like to finish narrative and location for brainstorming ideas.
2nd March:
For this day I would like to start and finish my storyboard so that when I do go and record, I will know what to do. After that I will include the shot list as well as the recce.
3rd March:😁
For this day I would like to complete the Risks and Hazards as well as the Legal and ethical as well as the script.
4th March:
For this is when I'll start my recordings and after I've done the recordings I'll start to edit them on the day.
5th March:
Adding anything else I'm missing onto the blog.
Planning:
The essentials I will need are as follows:
The locations which is a the woods.
An actor to act with me at the beginning of the scene.
Visual effects will be used ones I've done the edits.
Finally the genre is action.
Production Journey:
Throughout this task I've managed to create a schedule for my MFP to see what I'll be doing throughout the days before the deadline. This will help me to keep to see what I'll have to achieve throughout these days.
Inspiration:
What I'll be recreating is a scene from suicide squad where the character called Deadshot shoots at targets and doesn't miss. He also hits the targets at the same spot every time and even pierces through a metal target. However what I'll do is recreating something similar to that however I'm in the woods running through and shooting at targets.
Here is the clip to what I'll like to recreate.
I've also done some research on what to add in my edits for instance the gun muzzle flare effect and here is the video of it:
Narrative and location:
With my 20-30 second short film, I will open up the scene of me running to a location of the meeting whilst I'm 5 min late for it. I will be doing a low angle tracking shot of my legs and feet running through the woods to start it of intense. After I make it to the location, I'll be there panting whilst my hands are on my knees. This is so that the viewers are already keen to know whats going on.
After the conversation meeting, I'm put to the test to hit the targets that are scattered around the woods which is where I show off my camera skills as well ass my visual effect edits in Adobe After Effects.
Production Journey:
Throughout these tasks I've managed to talk about my inspiration for my mini project because I'll be recreating something similar towards it. I've also done some re search to help me out with my edits so that I know what and how to edit with visuals towards my edits.
Storyboard draft ideas (sorry for my awful drawing):

Shot one:
For this shot I will be shooting the protagonists legs whilst he is running through the woods. It will be a mid shot as well as a tracking shot.
Shot two:
For this shot it is still the protagonist running through the woods but this time its his upper body shot. It will be a close up shot and a tracking shot.
Shot three:
As the protagonist makes it to his destination where he is supposed to meet up, he arrives 5 min late and is breathing heavily whilst his hands are on his knees whilst the second character starts asking him questions to why he was late etc. It will be a mid shot to where the protagonist has his hands on his knees and also a close up to his face of his heavy breathing. after that it will be a mid shot of both the protagonist and the second character at a side view.
Shot four:
Ones the second character finishes his conversation, he then gives the gun towards the protagonist and he doesn't remember if its loaded already or not so the protagonists points at an direction and shoots to check. An extreme close up will be used as the second character hands the weapon to the protagonist. After that there will be a close up of the protagonist checking out the weapon and then a mid shot of him shooting the gun. This is where my visual effects begin.
Shot five:
For this shot the protagonist goes ahead and shoots at scattered targets in the woods. Some shots will have over the shoulder shots, some will have a close up of him shooting and then also a tracking shot of his legs running through the woods. This is so that it can make the scene much more intense.
Shot six:
For this final shot it will show all the targets with a close of each next too each other in the video. The targets will have the same hole where the protagonist shot to show his accuracy. This will however show at the top of the clip and at the bottom of the clip it will show the protagonist where he just finished the shooting range and takes off his glasses slowly as an extreme close up and finish's there.(However, this may differ).
Production Journey:
With this task I've managed to create a storyboard to help me know what types of shots I'll be producing when shooting the shots as well as what types of actions the actors will do throughout the shooting.
Practice run with my edits:
I've done here is I've added the sound of a gun, a reload sound effect for the gun, added lighting whenever I shoot and also finally the flame at the end of the gun as I shoot. I've used Adobe after effects for the edits for the gun and adobe premier for the sound of the gun.
Production journey:
What I've done here is I've produced my self a practise edit of me ''shooting'' a pistol by adding visuals in adobe after effects whilst recording it on my phone.
Shot list:


Script:


Recce:


Legal and ethical:

Risk assessment:

Risk and Hazards:

For this final task of the research I've managed to produce all of the work sheets for my mini final project to show what I need to include for each sheet for instance the risks, the shots, script, ect...
Comments
Post a Comment